This post will outline a strategy to build a NextJS app that can send prompts with image to OpenAI via its API, and get it to analyze the image and send back the analysis. It will not be a simple beginner guide, and instead go straight to the main parts that are needed. To get started, you will need these:
- Familiarity with React, TypeScript, and basic NextJS setup
- An OpenAI API key made with your own account in the OpenAI API platform. You can create an account here
- Basic web development understanding.
Let’s get started.
We start with the idea of creating an app. Users can select an image from their device. Then, OpenAI’s AI analyzes this image. It returns some information from it. It can be anything: analyzing nutritional value from a food picture, analyzing weather from a nature photography, or guessing a location based on a photo. The idea is the same. Send an image to an AI with a request, and receive a response.
1. Image considerations
First we let’s come up with an idea for example’s sake. We will ask OpenAI to look at an image, and generate a color palette with three colors derived from the image. For the prompt, we can say something like:
"Please analyze this image and return exactly three hex color codes derived from the dominant colors, formatted as a single string with the codes separated by commas (e.g., '#RRGGBB,#RRGGBB,#RRGGBB'). If you encounter any issues analyzing the image, cannot identify distinct colors, or otherwise cannot complete this task, please return only the string 'none'."Next, you need to decide which OpenAI model to use, as only some models support vision capability (i.e: able to receive image input/output). We only want to find image input capability. After some research and testing, I settled on GPT-4.1 mini:

Another model I’ve also tested is GPT-4o mini. While this model is cheaper ($0.15 • $0.6 input/output per 1m token), I found that it spent more token to analyze an image compared to 4.1 mini (cost calculation is explained here, and there’s a calculator in the FAQ section here). I’ve also found instances where 4o mini wasn’t able to correctly respond to identical request that I’ve asked 4.1 mini. Your experience might be different here and I don’t have any exact answer except to test and play around.
Finally, you need to decide how to send the image. OpenAI’s API accepts two ways:
- Passing a URL of an existing image
- Sending a Base64 encoded image
For this example, I will be using Base64 encoded image. The downside to this is that it will make the API request heavier as it has to contain a long string for the image, compared to a shorter string for just URL. But the upside of this is that it’s simpler to create: you don’t have to think about uploading user’s image somewhere first before using its URL.
Before we move on, bookmark this link as it contains the documentation for the OpenAI side: https://platform.openai.com/docs/guides/images-vision?api-mode=responses#analyze-images
2. NextJS setup
I will assume you already have a NextJS project running. Start one if you haven’t, there’s a guide here. For this article, I will use the App Router mode.
First, let’s use an existing component for picking image. In my experience, use-file-picker (link here) works pretty well for my need. Install that with npm i use-file-picker or yarn add use-file-picker as usual.
The setup is pretty clear, but here’s how I did it:
    const { openFilePicker, loading, errors } = useFilePicker({
        accept: ".png, .jpg, .jpeg",
        multiple: false,
        readAs: "DataURL",
        validators: [
            new FileAmountLimitValidator({ max: 1 }),
            new FileTypeValidator(['jpg', 'jpeg', 'png', 'JPG', 'JPEG', 'PNG']),
        ],
        onFilesSuccessfullySelected: ({ plainFiles }) => {
            handleSuccesfulSelection(plainFiles[0])
        },
    });
A few points from there:
- set
multipletofalseso that only one photo is accepted at once. - OpenAI supports PNG (.png), JPEG (.jpeg and .jpg), WEBP (.webp), non-animated GIF (.gif) as input. For simplicity’s sake, I only set PNG and JPG here.
use-file-pickerhas validators, which in my usage is a duplicate of theacceptandmultipleparameters. I add them both just to be safe.onFileSuccessfullySelectedis the callback once an image file is successfully selected. It passes an array ofplainFiles, so we pick the first item since we only accept one.
Aside: A bonus from using use-file-picker is that by default it works really well on mobile, too. With the setting above, it even allows for picking image or using camera to take a picture on iOS/Android.
Next, once we have the file object, we want to process and convert it to Base64 encoded string. Since we allow users to choose just any image, it can come in a variety of size. For cost and performance considerations, it’s a good idea to resize the image into something reasonably small and compress it too. However, the image still need to be large and clear enough for the AI to actually see what’s in it.
This is again an area where you need to experiment to get a good result, depending on your need. In my experience, resizing the image to a maximum of 512 pixels wide/height and setting its quality to JPEG 50% works pretty well.
For the resizing task, again we can use an existing component: react-image-file-resizer (link here). It worked well in my test, and as a bonus, it can output base64. Perfect for my need. Here’s what my setup look like:
import Resizer from "react-image-file-resizer";

// ... rest of code

    // Resize the image into smaller, lower quality one to reduce API token costs.
    const resizeImageToBase64 = (file: File): Promise<string> => {
        return new Promise((resolve) => {
            Resizer.imageFileResizer(
                file,
                512, // max width
                512, // max height
                "JPEG",
                50, // quality
                0,
                (uri) => {
                    resolve(uri as string);
                },
                "base64"
            );
        });
    };
We then can use resizeImageToBase64() to get the base64 string of an image that’s already resized and formatted properly.
Finally, you need to create the prompt somewhere. It doesn’t have to be anything fancy, just an export const imageAnalysisPrompt in its own file (e.g: lib/prompts.ts) should be enough.
3. The API call
Making API call is pretty simple whether directly client-side using React, or on the server-side with NextJS. The main consideration here, though, is that the OpenAI API call requires passing your OpenAI secret key. We should not expose it by directly calling it from the client.
A common solution here is to create a proxy server: your client (i.e: the front-end) should make an API call to your server (i.e: the back-end), and the server will then process that API call by doing its own API call to OpenAI API. As it retrieves the answer, it passes it back as a response to the original API call from your front end.
Front-end <-- API CALL --> Back-end <-- OPENAI API --> OpenAIWhile it sounds tedious and/or complicated, NextJS makes this easy with the Route Handlers.
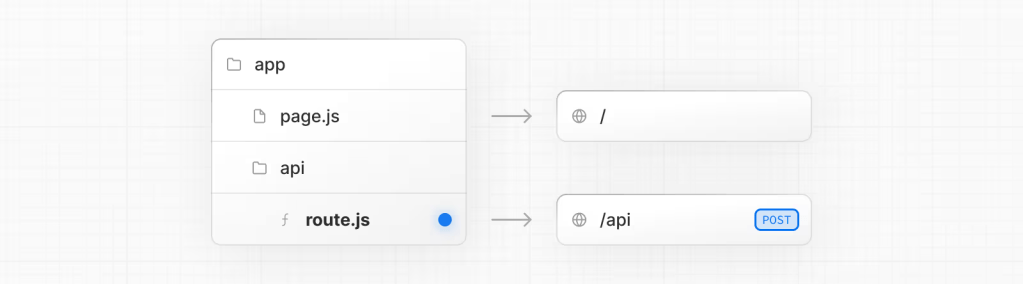
NextJS allows you to handle API request simply by setting up a route.js file and deciding what request to handle. For our purpose, simply create the api/ai directory under app, and create a route.js file in it. Our requirement:
- We want it to accept
POSTrequest, after which it should parse the request content and make an API call to OpenAI. - The request should contain two strings: one for the prompt, and another for the base64 image string.
- Add some error handling.
Here’s how the route code can look like:
import { NextResponse } from 'next/server';
import type { NextRequest } from 'next/server';
import OpenAI from 'openai';

// Initialize OpenAI client
const openai = new OpenAI({
  apiKey: process.env.OPENAI_API_KEY!,
});

interface RequestBody {
  imageBase64: string;
  prompt: string;
}

export async function POST(req: NextRequest) {
  try {
    // Parse request body
    const { imageBase64, prompt }: RequestBody = await req.json();

    // Make API call to OpenAI
    const response = await openai.responses.create({
      model: "gpt-4.1-mini",
      input: [
        {
          role: "user",
          content: [
            { type: "input_text", text: prompt },
            {
              type: "input_image",
              image_url: `${imageBase64}`,
              detail: "low"
            },
          ],
        },
      ],
    });

    // Extract just the text from the response
    const responseText = response.output_text || "No response text available";
    return NextResponse.json({ result: responseText });

  } catch (error) {
    console.error('OpenAI Proxy Error:', error);

    // Simplified error handling
    const errorMessage = error instanceof Error ? error.message : 'Failed to process image';
    return NextResponse.json({ error: errorMessage }, { status: 500 });
  }
}
There’s a few things to mention from the code above.
- Install the OpenAI package first if you havent.
npm install openai - You want to create an
.env.localfile in your local project and fill it withOPENAI_API_KEY=YOURKEY. This key is needed when creating theopenAIinstance above. In the production server, you also need to figure out where to put this key or else it won’t work. detail: "low". This parameter defines the level of detail used by the AI to process the image (documentation here). The low setting saves some token, and it works in my case, but you will have to play around with this parameter if you’re encountering issue. Perhaps a good idea to start with low first.
Aside: I ran into some issue following the official code documentation by OpenAI since their code example seems to be missing some things. The example I wrote above differs from the documentation, but it works (at least at the time of this publication).
Aside 2: To setup a proper proxy server will also need to think about things like authentication and authorization, as well as putting limits and perhaps caching too. You don’t want just anyone to hit the API all the time, that will be extremely costly. That is a topic for another article, though.
With the API route created, now we just need to go back to the client and make a POST call to the api/ai route. Here’s what my function call like (can be put inside something like form submit handling):
        try {
            const base64Image = await resizeImageToBase64(selectedFile);

            const result = await fetch('/api/ai', {
                method: 'POST',
                headers: {
                    'Content-Type': 'application/json',
                },
                body: JSON.stringify({
                    imageBase64: base64Image,
                    prompt: yourPromptString,
                }),
            });

            const data = await result.json();
            onAnalysisComplete(data.result);
        } catch (err) {
            console.error("Image processing failed:", err);
        }
And that is all! This should do a POST call, wait for the result, and then a function onAnalysisComplete() is called to handle the success result. You can setup that function yourself to do whatever you want with the OpenAI result (e.g: pass it to a Component that can then display the result nicely).
Hope this helps!

Leave a comment